Showing posts with label Time Machine. Show all posts

Sunday, October 14, 2012

FreeNAS Experiment - Part 1

One of the potential projects that I have wanted to experiment with is building a SAN (storage area network) box. After hearing about some positive experiences from friends like Retr0Rob (Twitter) and Bob Martens with FreeNAS over the past year, I found myself with the means to build a nice looking FrankenSAN box without any cash expenditures. Going forward, I think putting some money into the second project box will be helpful. But for this first experiment, I am in learning mode, so using existing hardware is fine.

The first decision to make for my experimental SAN box is to determine the purpose for which it shall be used in my home environment. Looking at how I currently use technology at home, there were immediately two processes that I knew I could move to a FreeNAS box. The Macbook Air I use was being backed up via a USB hard drive which meant a cable (ball and chain) attachment. The backup solutions I have in place are CrashPlan (off site backup) and Time Machine (local backup). CrashPlan works over the Internet wirelessly. FreeNAS would give me the opportunity to backup wirelessly inside my home. Secondly, I wanted to put CDs / DVDs I owned on a digital storage device that could play back through my PS/3. FreeNAS promised this functionality via its plugin architecture.

The hardware available was an HP xw4600 workstation with 4GB of DDR2 RAM, (2) 1 TB Hitachi SATA hard drives, and internal USB port connector and gigabit Ethernet. The software released this past Friday was FreeNAS 8.3 RC1. I guess timing is everything. I downloaded a FreeNAS guide and read some of the initial setup instructions. With a copy of FreeNAS downloaded, I initiated the terminal commands necessary to prepare a 4GB USB thumb drive with a bootable copy of FreeNAS. I plugged the 4GB stick into the internal USB port inside the HP xw4600, put the side cover back in place and pressed the power button.

Within 60 seconds, a text menu was showing on the monitor that allowed for refinements to the network interface settings (if needed) and the ability to reboot, reset and shutdown the FreeNAS box. Most importantly was the WebUI IP address needed for the administration of the FreeNAS box.


My first priority was to setup account passwords and add myself as a user / group for use later in assigning permissions to the shared dataset (volume) that I would create for storing Time Machine data. One of the cool features of FreeNAS is that you can use ZFS as a filing system. I used the volume management tools to create a ZFS mirrored volume of 931.5 GB out of the two 1 TB Hitachi hard drives.

Let me take some time to explain that when using ZFS to create mirrored RAID sets, there are some issues to be aware of in management. ZFS is a serious file system with safety protocols in place that make you consider how hard drive management should be done. For instance, if you create a ZFS mirror of two hard drives, then mess up your FreeNAS experiment and start from scratch, those hard drives are locked into a mirror that is not immediately usable. You must become comfortable with some command line work to fix or destroy old mirrors.

I became familiar with the gmirror and gpart commands in order to destroy the existing mirror from a previous failed FreeNAS experiment. ZFS is really pretty straightforward to learn, is logical in its command structure, and worth learning its commands to make it perform well. Here is a gmirror wiki page to learn about the command structure.


After created the ZFS mirrored volume, I created a ZFS dataset to be used as a Time Machine backup volume. For my experiment with just my Macbook Air doing backups, I carved out 250 GB of space. I then assigned permissions for this ZFS dataset to my user / group. As my friend Bob Martens pointed out, multiple Macs could use the same login credentials to use the Time Machine backup. Each Mac would identify itself by machine name.

Once the permissions were set and verified on the ZFS dataset for the backup, I next moved over to setup the Apple (APF) Share so that my Macbook Air could see the network store. I look at this process as connecting a volume with the ZFS file system to the Macintosh world which uses the Apple Filing Protocol. For those living in the Windows world, ZFS would need to be connected using the SMB (Simple Message Block) protocol.

Using the Apple Share settings of FreeNAS, I connected the ZFS dataset on the path shown in the image to the left here. /mnt/LundNAS/LundBackup

The Allow List and Read-write Access boxes are the places in which you specify the users / groups that will have Apple Share access to the ZFS dataset. To make things simple, the user / group permissions and these users for Apple Share should be aligned. I did try to use a group called Family with two users - my wife Julie and myself Perry. However, I found that it did not work well initially because of my bad ZFS dataset permissions. More future testing is required for multiple users with different login credentials.

Lastly, FreeNAS requires that the Disk Discovery checkbox should be enabled and the mode should be set to Time Machine in order for clients to backup.

My observations when configuring and using Time Machine on my Macbook Air showed me a few interesting tidbits. The Time Machine volume visible to select as my backup destination. Once selected, my Macbook Air showed it was "Looking for Backup Disk" and after finding it, mounted the Time Machine backup volume on the desktop and did the backup. Once the backup was done, the mounted desktop volume is unmounted. This is important since the Macbook is mobile and a mounted volume would cause problems for mobility.

So far the Time Machine backup server and service is working well.


Wednesday, September 19, 2012

Mobility Account Synching with Teachers

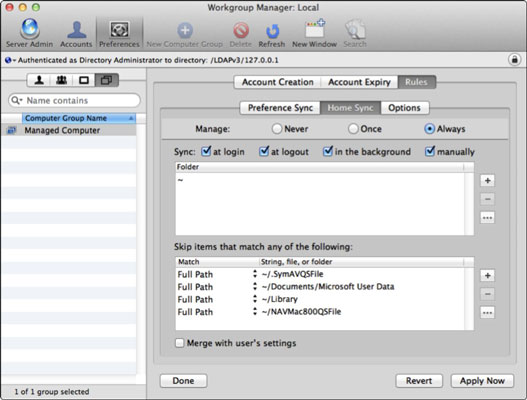
Currently the North Mahaska laptops issues to teachers and staff use Apple's mobility accounts. This has the benefit of keeping a copy of the files from the laptop on the local network server. To keep data synching to a reasonable level of activity, only documents and desktop files are synchronized and the ~/Library, ~/Movies, ~/Pictures, ~/Music are prevented from synching.

Managing Home Synchronization folders and exceptions


A couple typical issues have come up in the past year that prevent good solid synchronized files between the laptops and the server. Again, the primary culprit is human interaction and usage of the laptop in ways that while natural for them, cause issues on the technical level.

Issue 1 - I need to use my laptop now; I can't wait for synchronization of my files. By pausing or canceling the synchronization process, the local files on the laptop will not get pushed to the server. In affect, over time the number and size of the files for synching grows. And when a teacher or technology person needs to ensure a complete synchronization, then it takes a long time. In addition, if the server synch is a primary means of backup, the backup is NO good.

Issue 2 - I decided to save a new iPhoto library in my Documents folder and have been saving iDVD and video projects on my Desktop; its just easier that way! Apple's server technology is designed to exclude paths. When teachers make decisions on where they store large files like photos and movies, this makes synchronization more challenging. Combine Issue 1 with this issue and the synchronization issues really get messy.

Since the use of mobility accounts has generally worked well for the past 4 years, it seems natural to continue their use with Mountain Lion. However, we will continue to educate teachers on backups in hopes they buy the low cost USB external hard drives and use them for Time Machine backups. Now there may be those whom believe we could use our LAN and server hard drive space for Time Machine machines, but that space is limited right now. We are implementing Time Machine backups for network account users like secretaries and the nurse.

Good education and training for the teachers must be followed by teachers practicing what they learned to keep operations moving ahead smoothly. When teachers have solid reasoning for doing things contrary to their training from the school administration, they must communicate those ideas and practices so the technology can be adapted to work. After all, change is constant and we want to adapt to the needs of the classroom teacher in so far as it is possible and timely.

Monday, September 10, 2012

Time Machine Backups to USB Thumb Drives

"You are one crazy dude."

I can hear and see the comments coming a mile and a half away on this shin-dig. Many technology savvy people will be questioning the idea of using a USB thumb drive for a regular backup device. I agree with those technology folks and for my own personal and professional use, I would not use any sized USB thumb drive. So why am I publishing a YouTube how to video on this topic?


The school and the Apple 1:1 support team thought this was a workable solution for the students at a reasonable cost. Perhaps the thinking was that since other schools had tried USB thumb drives with some success, it was a good idea. Perhaps the thumb drives were the school's solution to providing a escape clause if the primary drive in the Macbook Pro died and the student forgot to backup.

The reason the YouTube video was created was to give the students with a screencast to show them how to do a Time Machine backup. It just happens that the Lexar 8 GB thumb drives they received along with their Macbook Pro is an option for a Time Machine backup. At the beginning of the video, I make a subtle hint on the USB drive's fragility and small capacity. I also point out the low cost of 500 GB external hard drives that connect via USB.

To further promote the idea of moving toward the external hard drive idea, here are some reasons why the USB thumb drives are not the best media for a Time Machine (or any regular) backup.


  • Thumb drives do not integrate well into backups because of versions and metadata.
  • Thumb drives do not integrate well with pockets, bags, dogs and small children since they are small and very easy to lose or misplace.
  • Thumb drives are physically flimsy and fragile. One local school in 2010-11 report a 50% + failure of thumb drives given to 7th & 8th graders over that school year - most due to physical damage.
  • Thumb drives are subject to corruption. People tend to unplug a drive without unmounting it.
  • Thumb drives have low read-write speeds relative to spinning disk media. Thumb drives are NOT solid state drives.
  • Thumb drives are not ubiquitous and their data does not naturally integrate with net-based cloud storage.
  • Thumb drives take up an extra USB slot on the Macbook Pro system.
My final thoughts here go towards the idea that Time Machine is a great built in backup utility that works very well - just not with USB thumb drives. Google yourself an appropriate sized external hard drive that works with either USB, Firewire or Thunderbolt and start backing up correctly.